Deedles Dish in a Nutshell

I am a Midwestern girl from a long line of cooks who doesn't think cooking needs to be complicated. Enjoy the recipes!

Thursday, December 29, 2011

Christmas Eve Dinner Purdy Style

Christmas truly is my favorite holiday.  It maybe used to be a favorite because of the presents but that's definitely not the case anymore.  The times when all five of us (mom, dad, Jeremy, Josh and I) are all together at the same time are becoming few and far between.  Life and miles have gotten in the way.  Christmas has become one of the few times where we can all spend some good family time together.  Every time we prepare for Christmas, my mom sends out the traditional "food" email.  What snacks, drinks, meals, etc. does everyone want to request? It isn't a Purdy gathering without food.

Here we go with another non-traditional holiday dinner for the Purdy family.  Growing up, I actually remember our Christmas Eve meal being pizza from Godfathers.  This is what we did for years.  One year, my oldest brother Jeremy complained that we weren't cooking together anymore so we started taking suggestions.  This can be tough with my family because Josh is a really picky eater.  (He's not so bad anymore but back then it was difficult to get him to try anything new. On an interesting note, he just texted me that he ate frog legs.  I think hell froze over.)  What does he suggest? BLOW-UPS! Our Christmases have never been the same.

I was really young when we started making blow-ups.  I know that we first had them at a family friends' house in Knoxville, IA and they were such a huge hit that we started making them at home.  Keep in mind that these take a lot of prep work and we actually only make them once a year...on Christmas Eve. 

Blow-ups are eaten with any taco toppings that you like so feel free to include anything I don't put on here.  I like mine kind of minimum but you could really include anything you want.  I'm going to include the recipe for the cheese dip we make as a side as well as my dad's bean dip, famously known as "Randy's Poo."  All you need to know about that nickname is that involves the Big 12 Basketball tournament in Kansas City, 4-6 college males and copious amounts of alcohol.

All right folks, here it is, creme de la creme...the famous Blow-Up!


Blow-Ups
2 loaves frozen bread dough
1 lb ground beef
1 packet taco seasoning
1 package taco cheese
sour cream
shredded lettuce
toothpicks

Make sure to put the frozen bread dough in the fridge to defrost about 12 hours before you're ready to start cooking.  Keep the loaves in the plastic wrapping as well, otherwise the bread will dry out and get a crust on top and you won't be able to work with it.  Also, do not let the bread rise all the way.  It's better to work with when it is just defrosted and not risen. 

Brown ground beef and add taco seasoning according to directions.  Plug in deep fryer and heat to 400 degrees.

Butter your work space so the dough does not stick to the surface.  Slice each loaf into 10 pieces. 


Work each piece into a circle as shown below.


Next, spoon 1-2 tbsp of taco meat in the middle of each dough circle.


Press and seal in a pocket and close with two toothpicks.


Drop into hot oil.  Do not put more than 4 or 5 blow-ups in the deep fryer at once.  Watch closely and flip the blow-ups when the bottom side is a golden brown.  When both sides are golden and crispy, remove and place on a paper towel lined plate to drain. 


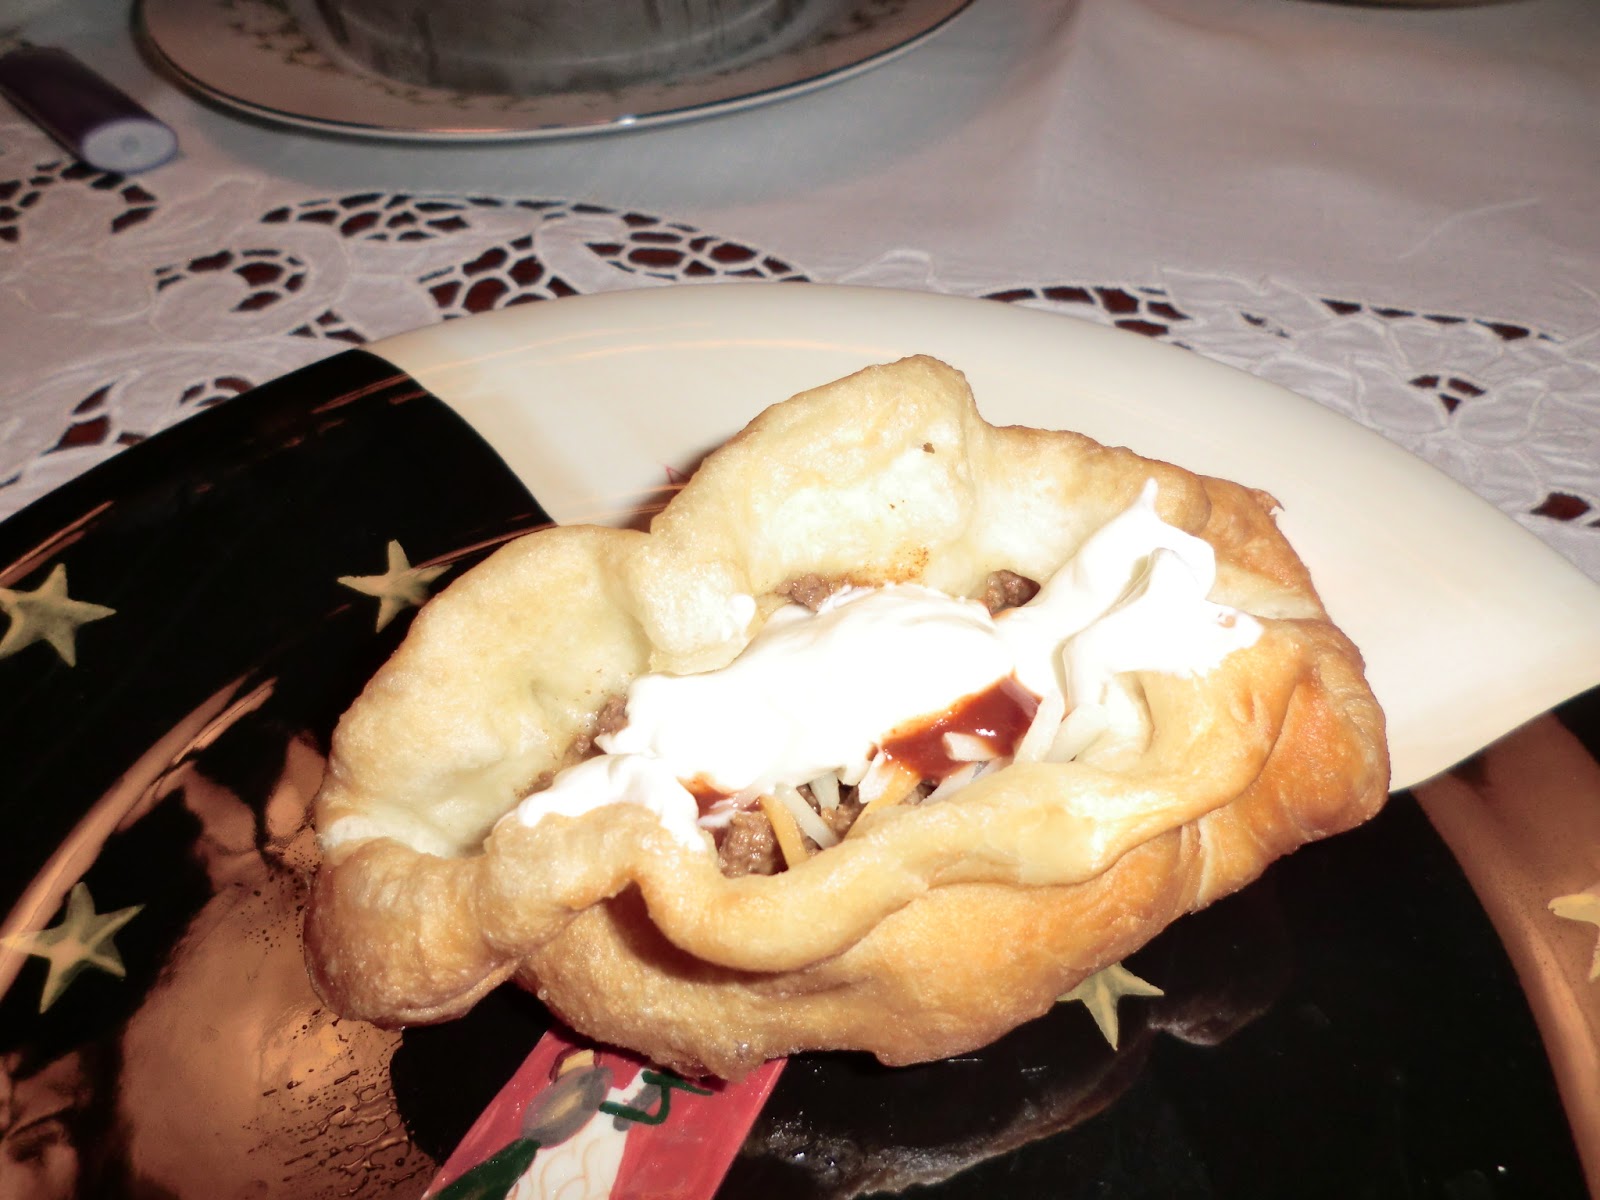
See why they're called blow-ups? :) Remove toothpicks and put your favorite taco toppings inside.  Eat like a pita or taco.  These are definitely a finger food.

Now on to the other two staples of Christmas Eve.  You can't have a family gathering at the Purdy/Menefee house without having cheese dip and Randy's Poo.  (Sorry, I have to call it that because "bean dip" doesn't do it justice.)

Cheese Dip
1 lb ground beef
1 large Velveeta (do NOT use cheddar cheese...gross)
2 cans Rotel tomatoes and green chiles

Brown hamburger and drain excess grease.  Heat Velveeta and tomatoes and green chiles in a microwave safe bowl for about 5 minutes on 60% heat.  Stir.  Return to microwave and repeat.  Stir in ground beef.  Continue to heat and stir until the cheese is fully melted and very liquidy.  It is a pet peeve of mine and my mother's when people add other things to this recipe.  Why mess with a good thing?


Randy's Poo
1 can traditional bean dip out of a can
1 cup Pace, medium, original salsa with the yellow lid
1/4 cup chopped white or yellow onion
1/4 cup sour cream

Combine ingredients.  This has always been a huge hit at tailgates and also at my housewarming party this fall.  People who don't normally eat bean dip raved!


Grab a bag of tortilla chips and dig in to the cheese dip and Poo! Be brave and put them both right in your blow-up...who's going to stop you??

It almost pains me to post this because it's such a Purdy family classic but who am I to keep the deliciousness a secret? It is actually an honor to share this tradition and remember, it doesn't matter what you eat on Christmas Eve (it can even be Godfather's pizza, Jeremy).  All that matters is that you are with the people you love celebrating the bond you all continue to share.  Happy holidays!

Good eatin',

Deedles

Quick and Easy...Sweet Potato Fry Seasoning

This is just a quick note I'm throwing on here.  I bought sweet potato fries from the store and was thinking about what I could do to jazz them up a little bit.  This little seasoning recipe that I put together was definitely a success!

Sweet Potato Fry Seasoning
1 tsp brown sugar
1 tsp garlic salt
pinch onion salt
pinch cayenne pepper

I fried the fries until very crispy and mixed the seasonings all together before putting it on the fries.  If you're baking, I would drizzle them with olive oil and add half the seasoning before baking and half after.  Enjoy!


Um, also take a second and look at my awesome bowl and dishes I got for Christmas! Awesome food pics to come with those for sure.

I was neck deep in a marathon of Chopped All Stars on the Food Network when I made and ate dinner.  Such a great show!

Good eatin',

Deedles

Wednesday, December 28, 2011

Giant Molasses Cookies

And the holiday cooking continues!!! Once again, I surprised myself with the baking skills.  My team at work was definitely excited to see these cookies walk in the door the meeting before Christmas and they did not disappoint.  Chewy, gooey, delicous-y...such a good holiday treat.

Giant Molasses Cookies
1 1/2 cups butter, softened
2 cups sugar
2 eggs
1/2 cup molasses
4 1/2 cups all-purpose flour
4 tsp ground ginger
2 tsp baking soda
1 1/2 tsp ground cinnamon
1 tsp ground cloves
1/4 tsp salt
1/4 cup chopped pecans (optional)
3/4 cup sugar (separate from above to roll cookies in prior to baking)

In a large bowl, cream butter and sugar until light and fluffy.  Beat in eggs and molasses.

Combine the flour, ginger, baking soda, cinnamon, cloves and salt in a separate bowl.  Gradually add to creamed mixture and mix well.  Fold in pecans if using.

Shape into 2 inch balls and roll in sugar.  Place 2 1/2 inches apart on ungreased baking sheets.  Bake at 400 for 16-18 minutes or until tops are cracked.  Remove to wire racks to cool.

For those of you in high altitude, I had to alter a few parts of this recipe to make sure it didn't fall apart here in the Mile High City.  Apparently, after some research, I discovered that water boils at a different tempterature in high altitude which is why baking can be a bitch.  They recommend increasing the cooking temperature and cooking for longer as well as adding a little more flour.  Here's what I did: Add 1/2 cup of flour to make it an even 5 cups.  Cook at 420 degrees and watch the bottoms carefully.  Mine ended up baking for approximately 15 minutes.  I also baked the cookies on partment paper to avoid burning the bottoms.

Here they are in all their glory! These were so soft and yummy and a hit with my family over Christmas as well.


Enjoy!

Good eatin',

Deedles

Monday, December 19, 2011

Crock Pot French Onion Soup

There may be nothing better than a good soup on a cold winter day....except being able to use your Crock Pot or slow cooker. It is one of the easiest things on earth.  I was lucky enough to get my Grandma Ruth's crock pot after she passed away so I get to think about the wonderful memories I have of her every time I pull it out.

I don't think I tried French Onion soup until I was about a senior in high school.  My mom ordered French Onion soup at Friday's and let me try.  I was hooked! The cheese...the bread...the broth...what's not to love??? I remember coming back from studying abroad in Sicily and requesting an immediate trip to Fridays.  Among several other things (honestly, I ordered about 6 different things), French Onion soup was one of the cravings I had to satisfy!!!

Crock Pot French Onion Soup
Soup:
3 large yellow onions, sliced
3 tbsp butter, melted
1 tbsp olive oil
3 tbsp flour
1 tbsp Worcestershire sauce
1 tsp sugar
1/4 tsp pepper
4 14.5 ounce cans beef broth
(1/4 cup red wine, brandy or ale can be added as well)
Cheesy Broiled French Bread:
8 slices French bread 1 inch thick
shredded mozzarella
shredded or grated Parmesan

Mix onions and butter in a 3.5 to 6 Qt slow cooker.  Cover and cook on high 1 to 3 hours or until onions begin to brown slightly around the edges (it will depend on your crock pot).  Whisk flour, Worcestershire, sugar and pepper as well as wine, ale or sherry if included.  Stir flour mixuture and broth into onions.  Cover and cook on low heat 7 to 9 hours or until onions are very tender.  Top sliced bread with cheese and place under broiler.  When cheese is melted, remove from oven and place in bowl with soup, either on top or bottom. 


Mmmmmm, hot cheesy and delicious!!

OMG I forgot that I have not been including my TV shows on my recent posts! What a travesty.  Well, back to the important things.  I was watching a marathon of Scouted while the soup simmered in my kitchen, interspersed with Criminal Minds and Law and Order: SVU...regulars in my household!!

Good eatin',

Deedles

Sunday, December 18, 2011

Ultimate Comfort Food...Chicken and Dumplings

I have a confession to make...I've never actually had chicken and dumplings before.  I know, right?!!! I came across this recipe in Taste of Home's October issue and tore it out with hopes of being brave sometime this winter and attempting the recipe!!

Boy, was I glad I did just that.  I had no idea how easy and delicious chicken and dumplings could be and it is a perfect winter comfort food.  I suggest adding or adjusting the vegetables as you or your family prefer.  Go ahead and spring for all of the spices and herbs because it really makes the dish unique and excellent. 

Chicken and Dumplings
6 cups reduced sodium chicken broth
3 bay leaves
5 fresh thyme sprigs
4 garlic cloves, peeled
1 tsp crushed red pepper flakes
-------------------------------
1 cup chopped carrots
1 cup chopped celery
3 tbsp olive oil
2 tbsp butter
3 garlic cloves, minced
2 tbsp all purpose flour
1 cup frozen peas (I omitted this from my recipe bc I don't like peas)
1 rotisserie chicken, shredded
1/4 cup heavy whipping cream
Dumplings
2 cups all-purpose flour
1 tbsp baking powder
1 tsp salt
1 tsp cayenne pepper
1 cup buttermilk
2 eggs, lightly beaten
1/4 cup minced chives

In a large saucepan, combine the first five ingredients.  Bring to a boil.  Reduce heat; simmer, uncovered for 30 minutes.  Strain and set aside.  While broth simmers, heat chicken if needed according to directions.  Tear apart. (I just went in and used my finger...it was much easier and more fun.)

In a Dutch oven, saute carrots and celery in oil and butter until tender.  Add minced garlic; cook 1 minute longer.  Stir in flour until blended; gradually add prepared broth.  Bring to a boil; cook 2 minutes or until thickened, stirring frequently.

Add peas, return to a boil.  Cook 3-5 minutes or until peas are tender.  Stir in chicken and cream; heat through.

For dumplings, combine the flour, baking powder, salt and cayenne in a large bowl.  In another bowl, combine buttermilk and eggs; stir into dry ingredients until just moistened.

Drop by tablespoonfuls onto simmering chicken misture.  Cover and simmer for about 15 minutes or until a toothpick inserted in a dumpling comes out clean.  Garnish with chives before serving.


This is such a great meal for a cold winter evening that the whole family will enjoy.  The spice in the broth and the dumplings gives it just the extra kick it needs. The leftovers are also amazing.  Enjoy!

Good eatin',

Deedles

Saturday, December 17, 2011

Spicy BBQ Chicken Pizza

Creativity is so important in the kitchen.  A lot of times, I try to look through my pantry and fridge to see what is available to me and use what I can find to make something amazing.  I had leftover gouda from the Butternut Squash Mac 'n Cheese that was posted a few weeks ago and I thought it would work great with a BBQ Chicken Pizza. 

BBQ Chicken Pizza is nothing new these days.  I remember back in the day when I was scared to try pizza outside of the box but it is now something I love (i.e. the homemade taco pizza).  I wanted to push it a little farther so I thought..."How can I make this spicy?"  The answer: add Sriracha.  It's my answer to most things. :)

Spicy BBQ Chicken Pizza
2-3 boneless, skinless chicken breasts
1/2 cup BBQ sauce of choice (I used Big Daddy's classic)
Appx 2 tbsp Sriracha sauce (start small and work up to taste preference)
2 pieces bacon
1 cup shredded mozzarella
1/2 cup to 1 cup shredded gouda depending on preference
1/4 cup red onion, thinly sliced
handful sliced green onion
chopped cilantro to taste
1 pizza crust

Heat oven to 400 degrees and prepare crust according to directions.  Mix Sriracha and BBQ sauce.  Baste chicken breasts with BBQ sauce using enough leftover for pizza sauce.  Bake chicken or grill until cooked thoroughly.  Chop into small pieces. 

While chicken is cooking, cook bacon to desired crispiness.  Tear gently into small pieces when cooled.

When pizza crust is ready, top with prepared spicy sauce.  Spread chicken.  Sprinkle bacon and chopped red onion.  Top with mozzarella and gouda cheeses.  Sprinkle green onion and cilantro on top.  Return to oven until cheese is melted thoroughly.


Slice, serve and enjoy this easy spin on what has become an American classic in the pizza world!

Good eatin',

Deeldes

Bacon and Scallion Pesto Flatbread

What am I thankful for, you ask? Holiday parties!!! Even though this time of year is hectic and crazy with the holiday shopping, weather, dinners with friends and all of the above at the same time, I love that people take time out of their lives to sit down and spend time with the people they care about. 

A holiday dinner in Longmont was the perfect place to try out a new appetizer recipe I found on http://www.foodnetwork.com/.  I'm a big proponent of eating while you're cooking and this "appetizer" is perfect for just that. 

Bacon and Scallion Pesto Flatbread
4 thick strips of bacon, thinly sliced
1 large white onion, thinly sliced
Pinch of sugar
Salt and pepper
1 tsp capers
1/2 cup fresh parsley
Grated zest 1/2 lemon
1/4 cup olive oil
1/3 cup sour cream
1 lb frozen pizza dough, thawed, or 1 large Boboli crust

Preheat oven to 450.  Cook the bacon in a large skillet over medium heat until browned and crispy.  Transfer to paper towels to drain; keep warm.  Add the onion slices to the drippings in the skillet; sprinkle with the sugar and season with salt and pepper.  Cook until light brown and tender, about 5 to 7 minutes.  Taste for seasoning.

Combine the scallions, capers and parsley in a food processor.  Add salt and pepper to taste and half of the lemon zest; pulse gently to chop and blend.  Turn the processor on and add the olive oil in a steady stream.  Transfer the pesto to a bowl; set aside.

In a small bowl, whisk the sour cream and remaining lemon zest until smooth.  Season with salt and pepper; set aside.

Roll out pizza dough on a lightly floured surface into an 8x14 inch rectangle.  Roll the dough around a rolling pin and unroll it onto a baking sheet lined with parchment paper.  Place in the center of the oven and bake for 10 to 12 minutes or until golden brown.  I used a large Boboli crust.  I brush the bottom with olive oil and heat directly on oven rack until crispy.

Spread the sour cream mixture on the crust.  Dot with the onions and some of the bacon drippings from the pan; sprinkle with the bacon.  Slice into pieces and drizzle with scallion pesto.


Enjoy with friends and family!

Good eatin',

Deedles

Sunday, December 11, 2011

Baked Brie

It is that time of year again! Dinner parties, work parties, holiday parties...so much to do, so little time! For an easy, delicious treat that will impress your friends, try this Baked Brie.  I got the recipe from a dear friend during Thanksgiving last year.  It was one of the many things we stuffed our faces with, but it stuck out because it was so delicious.  Your friends will think that you spent hours on this but it is actually easy and doesn't take too long. 

Baked Brie
2 tbsp grated parm (approximately)
2 tbsp finely chopped fresh basil
1 round Brie (about 14 oz)
1/2 package of Pepperidge Farms Pastry sheets (freezer section)

Defrost pastry sheet according to package instructions.  Heat oven to 400.  Mix basil and parmesan and set aside.  Cut Brie in half horizontally and sprinkle the basil/parm mixture evenly over the open Brie.  Place the other half on top and press down to put back together.  Roll puff pastry on floured surface.  Cut two circles out (larger than the actual Brie).  Place the Brie on the puff pastry circle and then place the other cut circle on top.  Pull the bottom circle up and over the Brie and mold the puff pastry together.  Brush the edges with water to seal the pastry together.  Make sure it is thick on the side so that the cheese doesn't leak out when baking.  Bake for 25 minutes or until golden brown.  Place on a wire rack for about 15-20 minutes before serving.  Serve with crackers or bread or BOTH! :)


Enjoy this decadent dish with friends and family over the holiday season!

Good eatin',

Deedles

Saturday, November 26, 2011

Butternut Squash Macaroni and Cheese

I was just talking to my mom the other day about how I don't remember many "traditional" Thanksgiving meals growing up.  Yes, we would usually have turkey at my Grandma Purdy's house.  Usually mashed potatoes and gravy.  Probably a green bean casserole.  But we didn't usually do yams and squash or even cranberry sauce.  We didn't have stuffing either, at least from what I remember.  Keep in mind that I was a picky eater for awhile there so it is very likely that those things actually WERE at the dinner, I just chose to ignore them.  Either way, I didn't get to those traditional things until I was older. 

I've warmed to squash over the last few years but it's still not a favorite of mine.  When I came across this recipe, I thought it was the perfect combination of something I LOVE and something I'm learning to love.  And also a perfect side at a Thanksgiving dinner with friends.

Butternut Squash Macaroni and Cheese
1 small butternut squash (about 1 lb) peeled, seeded and cut into one inch cubes
1 lb elbow macaroni
1 small onion, diced
1 cup chicken stock
1 1/2 cups skim milk
3 tbsp butter
2 tbsp flour
1 tbsp fresh sage, minced
2 cups grated gouda cheese (not smoked, they recommend aged Marieke)
1 cup grated two year old aged parmesan cheese
1 teaspoon Dijon mustard
Pinch of freshly grated nutmeg
Pinch of Cayenne pepper
1/2 cup crumbled gingersnap cookies (about 8 cookies)
1/2 cup chopped pecans
1 tbsp olive oil
salt
pepper

1. Preheat the oven to 450.  Toss the squash with olive oil, salt and pepper to season on a foil-lined baking sheet for 20-25 minutes until lightly browned and easy to stick a fork into.  Set aside and turn oven down to 350. 

2. While the squash is cooking, put cookies and pecans in a food processor and pulse until the mixture is as chunky or thin as you like. 

3. Bring a large pot of salted water to a boil.  Add macaroni and cook until al dente according to package instructions.

4. While the pasta cooks, heat a large pan over medium heat.  Add the butter, chopped onion and sage.  Saute about 4-5 minutes until onions are translucent.  Add the flour and stir to combine.  Let the mixture cook for 1-2 more minutes.  Whisk in stock and milk and let come to a boil to thicken up.

5. Next, add the cheeses, mustard, nutmeg and cayenne.  Stir to combine.  Then, mix in the squash.  Use a whisk to mash up the squash a little.  It's up to you on if you want to leave some chunks in the sauce or not.  Salt and pepper to taste.

6. Drain the cooked pasta and return it to the pot.  Pour the sauce over the pasta and combine well.  Pour the mac n cheese into a buttered casserole dish.  Sprinkle the gingersnap cookie pecan crumble over the top and drizzle with a little olive oil.

7. Cover with foil and bake at 350 for 20 minutes.  Remove foil and continue until lightly browned on top, about 30 minutes more.


This is time consuming but, as I said earlier, perfect for a different spin on a Thanksgiving favorite.

Good eatin'

Deedles

Overnight Mashed Potatoes

Mashed potatoes are pretty much a requirement at every family and holiday gathering.  I even make them outside of those special occasions because I love them so much! Since I didn't make it home with family this Thanksgiving, I spent the day with my three best friends.  We each brought some dishes and Lila made a 12 lb, yes 12 lb, turkey for the four of us.  There was a specific request for mashed potatoes by Angela and I had to oblige. 

Making a dish for a holiday party can be tough because of timing.  I was making a couple of other things as well and getting everything ready and hot at the same time can be really hard.  These overnight mashed potatoes are perfect because you make them the night before and just heat them up the next day.  Simple as that!

Overnight Mashed Potatoes
2 1/2 lb red or gold potatoes
6 tbsp butter, divided
4 oz chive cream cheese, divided
2 cup light cream
salt
pepper

Peel and cut the potatoes into chunks.  Place in a large pan and cover with cold water and salt.  Bring to a boil and cook until it is easy to slide a fork into the biggest piece, approximately 30 minutes.  Drain the potatoes and place them in a large mixing bowl.  Add 2 tbsp butter and the cream cheese, salt and pepper to taste.  Beat until the potatoes are creamy and whipped, adding 2 more tbsp butter halfway through.  Once the mixture is beat completely, pour it into a greased baking dish and refrigerate.  When you're ready the following day, dot with butter and a dash of paprika.  Heat in the oven at 325 for 30 to 45 minutes. 


This is not going to win you any awards for a healthy mashed potato dish but it is sooooo good and your guests and family will love it.

Good eatin',

Deedles

It's a Thanksgiving Miracle!!! (I made a pie)

Hello, hello everyone out there in food blog land! I have been taking a breather from the blogging due to my insanely busy schedule this fall.  I went back to Iowa for some sad events that I would rather not discuss, was back AGAIN for one of my best friend's wedding (love you Kerri), visited my brother in San Francisco for a great sibling weekend and then just returned from Jamaica for the wedding of yet another bestie...whew!!! Yes, it has been a crazy few months but I am so excited for the holiday season.

I enjoy so much about the holidays.  I even love when the weather changes and starts getting chilly.  I get to cuddle with my cute little kitty that way! What I especially love about the holidays is the food.  No shocker there, I think that is most people's favorite parts.  I love the classics that I get to make with my family every holiday season but I also really like trying new recipes as well.

Unfortunately, this was the first Thanksgiving I did not get to spend with family.  I didn't realize how tough it would be but, I guess after 28 years, the routine is set in.  Since I couldn't be home, I decided to dive head first into some new recipes that I wanted to try.

I've said a million times in this blog that I am no baker.  I make a few things here and there and pretty much stick to those, rarely stepping outside of my comfort zone.  Interestingly, some of my co-workers encouraged me to make this recipe.  Sometimes our meetings get pretty intense, so I try to bring treats to lighten the mood and put smiles on people's faces.  This pie was a delicious Thanksgiving treat for our meeting last Wednesday. 

It was not easy, just ask my mom since I called her probably 8 times throughout the night.  That's what I don't like about baking....it's hard to know how things are going to be until you're already through the long and arduous process.  While I had little faith in my baking abilities, apparently they are in there somewhere because this pie was delicious.  Enjoy at your next holiday gathering!

Spiced Pumpkin Custard Pie
3/4 cup chopped pecans, toasted
1 cup plus 2 tbsp all purpose flour
1/2 tsp ground ginger
1/2 tsp salt
7 tbsp shortening (I used Crisco)
2 tbsp plus 1 tsp ice water
Filling:
2 eggs
3/4 cup sugar
1 tsp ground cinnamon
3/4 tsp ground allspice
1/2 tsp ground ginger
1/2 tsp salt
1 15 oz can solid pack pumpkin
1 12 oz evaporated milk
whipped cream, optional (but not optional in my opinion, haha)
additional ground cinnamon, optional

1. Place pecans in a food processor; cover and process until finely ground.  In a large bowl, combine the pecans, flour, ginger and salt.  Cut in shortening until mixture is crumbly.  Gradually add water, tossing with a fork until dough forms a ball.  Press dough onto the bottom and up the sides of an ungreased 9 in. pie plate. 

2. For filling, in a large bowl, beat the eggs, sugar, spices and salt until smooth.  Beat in pumpkin.  Gradually beat in milk.  Pour into crust.

3. Bake at 400 for 40-45 minutes or until a knife inserted near the center comes out clean.  Cover edges with foil during the last 15 minutes to prevent overbrowning if necessary.  Cool on a wire rack.  Garnish with whipped cream and additional cinnamon if desired.  Refrigerate leftovers.

The reason I was so nervous about this is that the filling was very "liquidy" as I was mixing it with my mixer.  I had to cook it longer than the time specified above but it could be for a few reasons.  A: my oven is awful right now and I don't think it gets very hot...B: I live at a higher elevation, which may have played a part as well. 

Anyway, the pie was a huge hit.  The crust was really tastey and easy to make as well.  My co-workers were very pleased with this delicious fall treat!


Good eatin',

Deedles

Sunday, October 23, 2011

Housewarming Party Shenanigans...and Chicken Tacos to top it all off

Hello, hello! First off, I apologize for not taking pictures of this.  I'll add something from online because I can't handle not throwing a pic in here and there.  So, as many of you know, the life changes just keep coming for me.  Now single and in my own apartment, I had to commemorate my new adventure with all of my best friends.  The food was more of a side dish to the alcohol but it was still delicious.

The crock pot chicken tacos were seriously so easy and absolutely delicious.  I recommend this for any sort of party or bigger gathering but you can also freeze the meat and use it for taco salads, burritos, enchiladas, nachos, etc.  You could also use pork for another yummy treat.

Slow Cooker Chicken Tacos
Ingredients
2 lbs boneless, skinless chicken thighs (I used almost 3 lbs but it was for a party so use your best judgment)
1 can diced green chiles
1 12 oz can of salsa (your choice on spice level, etc.  I used a roasted tomatillo.)
1 tsp ground cumin
1 small sweet onion, chopped
2 cloves garlic, minced

Place chicken in slow cooker.  Top with chiles, salsa, cumin, garlic and onion.  Cook for 8 hours.  Remove chicken from bowl.  Shred and return to juices. 

Aaaannnnnnnnddddd, that's it!!! Can you say easy? And it was so good.  Top with your favorite taco toppings in hard or soft taco shells and you have a crowd favorite on your hands.


Good eatin',

Deedles

Sunday, October 9, 2011

Yummy Iowa Corn Chowder

On a chilly October day, this was the perfect recipe.  I first had this chowder when I was back in Iowa for my grandfather's funeral.  My aunt's mother-in-law and a close friend to my grandparents brought over a big pot of corn chowder to feed our large, mourning family.  I couldn't get enough then and I can't help but make it around this time of year.  So yummy and really quite easy.

Ingredients
4 slices bacon finely chopped
1 medium onion (sweet or yellow), chopped
4 medium potatoes, cubed
1 c. water
4 c. corn (fresh or frozen)
2 c. half and half
1 tsp sugar
1/4 c margarine
2 1/2 tsp salt (to taste)
1/4 tsp pepper (to taste)
1 c. milk

Saute bacon in dutch oven or large saucepan.  Add onion, potatoes, and water, cover and bring to boil.  Simmer 10 minutes or until potatoes are tender but not mushy.  Remove cover and set aside.  In medium saucepan, combine rest of ingredients and simmer covered 10 minutes.  Combine and heat over low heat.

Tips: I actually cook the bacon first, let it cool and then break it up by hand.  I find it easier than cutting raw bacon.  I also used 5 slices instead of 4. :) When you combine the bacon and onion in the dutch oven, I added a little bit of butter to keep it from sticking to the pan before adding the potatoes and water.  I let this chowder simmer on the lowest temperature for 3 hours before serving, stirring occassionally.

If you have fresh Iowa corn or even frozen Iowa corn, USE IT!! If you don't, that's okay because it's still absolutely delicious.  And leftovers will not disappoint.


Good eatin',

Deedles

Saturday, October 8, 2011

A Tribute...The "Famous (or Infamous)" Lasagna

I've been procrastinating on this post.  It's a tough one.  When I made this with the intention of putting it on my blog, this posting would have been nothing by happy stories and smiles.  But since then, tragedy struck and it may take a different tone.  Sorry.  I'll try to keep it light and keep it as titled...a tribute.

I have talked a lot about my family on this blog so it's not a surprise that we are all extremely close.  Extended family included.  Our family gatherings are some of my favorite memories and times that I look forward to even as an adult.  There are certain requests everyone has and, unfortunately, the person who made them is no longer around but we do our best to replicate Grandma Ruth's macaroni, rolls, cinnamon rolls, ham balls...the list goes on and on.  But there is another thing that is ALWAYS requested. 

Aunt Sherri is a quiet presence at our family gatherings.  (It's not her fault, Menefee's are a loud bunch.) She takes her time to approach her nieces and nephews individually to check in and see how we are doing.  She can almost always be found with a grandchild on her hip or answering to a "Grandma Sherri" request.  She tends to her brood tenderly and unassuming.  Even in the face of recent tragedy, Sherri put family first and was making sure her grandchildren were cared for and loved.

But I digress, I love my Aunt Sherri and couldn't help myself.  Her famous contribution to our family dinners is lasagna.  My cousins and I would wait with baited breath to see if we would see Aunt Sherri carrying in her casserole dish with tin foil on top...because we knew what it was.  LASAGNA! A meal that intimidated me from the outset, thus my procrastination in asking for/making the recipe.  I mean, who wants to be the person to screw up Sherri's lasanga? Not I.  But don't fret, this recipe is not too complicated and is absolutely delish.

Ingredients
1 box lasagna noodles (regular or I use Barilla "no boil" lasagna noodles)
1 can stewed tomatoes (or diced tomatoes with Italian seasoning)
1 can tomato sauce
1 can pizza sauce
1 container cottage cheese
1 larger package of shredded mozzarella cheese
1 lb hamburger or Italian sausage
Shredded parmesan for topping
10x13 pan

Boil noodles and drain (usually about 12).  Brown meat.  Drain off any grease.  Add the tomato sauce, pizza sauce and tomatoes to the meat. 

Lay noodles along the bottom of the pan.  Spoon meat sauce on noodles.  Cover sauce with 1/2 container of cottage cheese.  Add approximately 1/2 the bag of shreeded mozzarella.  Add more noodles.  Spoon on more sauce, leaving enough to use on top.  Add rest of the shredded cheese.  Last layer of noodles.  Spoon on the rest of the sauce.  Sprinkle parmesan on top.  Bake at 350 for 30 minutes.

Note: If you use the no-boil lasagna, be careful with the sauce.  You need to cover the bottom of the pan with sauce first and also make sure that all of the top layer of noodles are covered by sauce so the noodles bake and don't burn.  Also, follow heating and timing instructions according to the box.  You cook for 45-55 minutes using no boil noodles.


I like to serve with some sort of bread and salad to round everything out a little.  Eat and enjoy!

So there it is...Aunt Sherri's lasagna.  Bake and serve carefully as there is a lot of love associated with this recipe.  Next time I make this, I'll have some different memories but that's ok.  The underlying factor is still love.

Good eatin',

Deedles

Sunday, September 18, 2011

It's a Fruit Field Day!!!

I know it's been awhile since I've posted and I apologize.  Sometimes life just manages to get in the way.  I made the following for a friend's birthday party about a month ago.  I generally do not make desserts to take to parties but my friend was already making delicious pulled pork tacos and mucho more delicious treats and I wanted to follow the theme so I made White Sangria and Fruit Enchiladas.  Both are super easy and delicious. 

White Sangria
Okay, I get that there is a contradiction here.  Sangria is named after sangre because it looks like blood so white sangria doesn't make sense.  It's delicious, though, so who really cares?

Ingredients:
1 bottle white wine (I used Seven Daughters, which is a blend)
1 bottle ginger ale
2 tbsp sugar
2 lemons
2 limes
1 orange
various other fruits (I used a pear, one granny smith apple, and a fresh pineapple)

Chop fruit and soak it in the wine in the fridge to chill overnight.  Add the sugar and ginger ale before serving.  Be sure to eat the fruit! The pineapple was my favorite. ;)


Fruit Enchiladas
These were so easy and so yummy.  A hit at the party for sure! I doubled the recipe for the party.

Ingredients:
6 small tortillas (4 inch)
Fresh fruits of your choice, chopped, to amount to 2 cups (I used blueberries, Colorado peaches, strawberries and red raspberries)
2 cups almond milk
1 tbsp butter
1 tbsp flour
1/2 tsp cinnamon
2 tbsp sugar (more or less depending on taste)

Preheat oven to 350 degrees.  Begin by preparing the cinnamon vanilla sauce.  In a saucepan, melt butter over medium heat.  Whisk in flour to create a roux, then add in milk, whisking continuously.  Add in vanilla, cinnamon and sugar while stirring.  Let the mixture come to a light boil (even just bubbbles on the edges are fine) and continue to stir while mixture thickens - about 4-5 minutes.  Turn down to low and stir.  You want it to lightly coat the back of a spoon, but not be too thick.  You can also taste test here and see if you'd like to add any additional cinnamon, sugar or flavoring.

Place about 2 tbsp of chopped fruit in the center of the tortilla and roll.  Spray a baking dish with non-stick spray, ladle 1/2 cup of your vanilla sauce on the bottom of the dish, then lay your enchiladas seam-side down.  When all are rolled, cover with more vanilla sauce.  Keep a little on hand to add on top when they come out of the oven.  Bake for 15-18 minutes, or until fruit in the middle begins to burst and soften.  Serve immediately with the extra sauce on top.


I know we're getting into fall and winter but keep these recipes in mind for spring and summer get-togethers.  They will be a huge hit, I promise!

Good eatin',

Deedles

Thursday, August 11, 2011

Ode to...Basil


I have been waiting so long for this post!! I wanted to include everything to do with this luscious herb.

I cultivated my love for basil while studying abroad in Italy.  I learned to put it in the obvious things...bruschetta, spaghetti sauce, pizza sauce, etc.  In Italy, we didn't have cookbooks.  We learned by trying and tasting...and tasting...and tasting.  Did I mention I gained 20 lbs in Italy? Oh well, it was worth it.  This was a great experience and has translated into my love of cooking as well as my cooking style these days.

Basil has a unique, minty flavor.  The picture shown above is basil that I grow on my front stoop.  I love having it handy for flavoring many dishes.  I have started putting basil in almost everything and am discovering that it, indeed, CAN be put in almost everything.  The following pictures and recipes are examples of how I have used basil in the last few months and how it can be used regularly in your home.

This first one might seem strange but go with me.  Basil in eggs.  My friend, Lila Scott, who owns Colorado Backyard Farms and specializes in planting organic gardens for businesses and homes recommended that I put basil in eggs when I was looking for new ways to use my favorite herb.  I'm glad I took her advice because it is a delicious way to put a new spin on a breakfast classic.


I love putting fresh basil on pizza. Right under the cheese with the rest of your toppings...it's so good!!


I don't think I've mentioned my second love...cheese.  I love any and all cheese but fresh mozzarella and parmesan rank right up there as a favorite.  The mozzarella tomato panini with basil mayo is a new favorite.  It's so easy and tastes so fresh!  Here's the recipe for basil mayo:

Basil Mayo
Ingredients:
1/2 cup good mayonnaise
5-10 basil leaves, finely chopped
1/2 tbsp good olive oil
1/2 tsp lemon juice
1/2 tsp minced garlic
salt to taste
pepper to taste

Whisk together the ingredients. 


Put on french bread and toast the fresh mozzarella and tomato in a panini maker.


Bruschetta is one of those easy things that I always forget about.  It's a great thing to have for dinner parties or to throw together when you have a friend coming over.  Chop roma tomatoes, sweet onion, basil, garlic and mix.  Salt and pepper to taste. Serve on french or italian bread and top with grated parmesan. So easy!!!


And now, here it is, the ultimate recipe that shows how versatile basil can really be...MANGO CHEESECAKE WITH LEMON BASIL DRIZZLE.  Yes, you read right.  Mango cheesecake with lemon basil drizzle.  I had never made cheesecake before but this is a recipe I will DEFINITELY make again.  It was a hit with friends and co-workers.  From Giada DeLaurentis.

Mango Cheesecake with Lemon Basil Drizzle
Mango Puree Ingredients:
3 mangoes, seeded, peeled and sliced
1/4 lemon, juiced
1 tbsp sugar

Combine ingredients in a blender.  Puree until smooth.  Add water, 1 tbsp at a time, just until mixture will puree smoothly.  Puree should be thick.

Mango Cheesecake Ingredients:
8 oz biscotti (I couldn't find this at any regular grocery and eventually went to an Italian bakery...I recommend skipping the regular grocery and going right to the good stuff)
3/4 cup butter, melted
2 (8 oz) packages cream cheese, room temp
1 cup whole milk ricotta cheese, room temperature
2 cups mango puree
4 large eggs
3/4 cups sugar

Preheat oven to 350 degrees.  Wrap the outside of a 9 inch springform pan with two layers of heavy duty foil.  Finely grind the biscotti in a food processor.  Add the melted butter and process until the crumbs are moistened.  Press the crumb mixture over the bottom (not the sides) of the prepared pan.  Bake until the crust is golden, about 15 minutes.  Cool the crust completely on a cooling rack.

Blend the cream cheese and ricotta in a food processor (I used my mixer).  Add the mango puree, eggs and sugar and pulse until the mixture is smooth.

Pour the mango mixture over the crust in the pan.  Place the springform pan in a large roasting pan (Thanks Grandma Ruth!!).  Pour enough hot water into the roasting pan to come halfway up the sides of the sprinform pan.  Bake until the cheesecake is firm and moves slightly when the pan is gently shaken, about 1 hour and 30 minutes.  Transfer hte cake to a cooling rack to cool for 30 minutes.  Place in the refrigerator and cool completely, at least 8 hours and up to 2 days.

Lemon Basil Drizzle Ingredients:
1 cup sugar
1/4 cup water
1/4 cup lemon juice
1 packed cup fresh basil leaves

Place the sugar, water and lemon juice in a small saucepan.  Bring the mixture to a simmer over medium heat and cook until the sugar is dissolved.  Cool the syrup completely.  In a food processor, combine the basil and cooled syrup.  Pulse until the herbs are finely chopped.  Strain the mixture through a fine mesh sieve.

Slice the cheesecake and drizzle sauce.  Serve.


I hope I've made it clear that basil can be used in so many wonderful and creative ways!! Have a new basil recipe for me to try? Post it please!

In the meantime, stop and smell the basil.

Good eatin',

Deedles

Tuesday, August 2, 2011

Comfort Food: Iowa Style

If God had intended us to follow recipes,
He wouldn't have given us grandmothers.
~Linda Henley

BBQ Meatballs, Ruthie's Mac'n Cheese, and Mashed Potatoes

This post is a shout-out to all of my midwestern comrades, especially those who live away from home! We all have those moments where only food can make us feel better.  Where do we turn? Comfort food.  I find it so interesting that different regions have different comfort food.  Some places slather it with green chile (ahem, Colorado), others put pasta above all else and still others produce these delicious things called cheesesteaks.  Yum, yum, yum.  But when you're from Iowa, comfort food has its own special meaning. 

When I cook comfort food, I think of my grandmothers.  Angel Ruthie and Dottie, with their constant presence in the kitchen.  Ready for hugs at the door, pots on the stove and oven hot, aromas wafting through the house, and a spoon ready to give a taste if needed (which it always was).  I can hardly conjur up any other memories that make me feel like this recipe - comforted.

Lucky for me, this tradition was passed on to my mother (who also gave me this recipe as well as my love for meat).  We comfort each other in many ways in my family.  Hugs, laughter, jumping out from a dark corner...you know, the usual.  But food is a big one.  We always ate as a family growing up and this has continued into adulthood.  Time to share our days and catch up on how everyone is doing.  The bonding time has been invaluable...thanks mom and dad.  Every birthday we got to pick our favorite meal to have mom cook for us.  At Christmas, we practically have a fight to the death to decide what the meal is going to be (it's always blow-ups...recipe to come). 

So for those of you who find yourself missing home every once in awhile, this meal is for you.  Add a PBR.  I did.

BBQ Meatballs
Serves 4-5
Ingredients:
1 1/2 lb ground beef
3/4 cup rolled oats (Quaker Oats)
1 tbsp onion
1 1/2 tsp salt
1/4 tsp pepper
1 cup milk
flour to dredge
3 tbsp oil

Sauce:
2 tbsp sugar
2 tbsp Worchestershire sauce
1/2 cup water
1/4 cup apple cider vinegar
1 cup ketchup

Combine sauce ingredients and set aside.

Combine meat, oats, onion, salt, pepper, and milk.


Form into small balls.  Roll in flour.


Brown in oil in heavy skillet or electric fry pan set at 360 degrees.  Cover with bbq sauce and turn heat to low and simmer until done.


Ruthie's Mac'n Cheese
Serves 4-5
Ingredients:
2 cups macaroni, cooked according to directions
6-8 oz Velveeta
1/4-1/2 cup of milk
1/2 stick of butter
garlic powder to taste
onion powder to taste
dash salt
dash pepper

Add Velveeta, butter and milk to noodles until combined.  Add garlic and onion powder little by little, tasting until you can identify the flavors through the cheesey Velveeta deliciousness. Once the flavor is good for you add a dash of salt and pepper and you're ready to go.  This was always a favorite, if not THE favorite, of the grandkids growing up.  Ruth Menefee made the best mac'n cheese around. 


This time, the mashed potatoes were not homemade.  I'm not ashamed! I put a lot of work and love into the other two dishes.  I was so stuffed after I ate this meal that I could barely move, but isn't that what comfort food is for?

Doesn't this just say it all? I love all my grandparents so much and miss the ones that aren't here every day.

A child needs a grandparent, anybody's grandparent, to grow a little more securely into an unfamiliar world.  ~Charles and Ann Morse

Friday, July 29, 2011

Penne Leonardo with Sweet Onion Focaccia

Well, here it is folks! The recipe I mentioned earlier this week in all of it's glory.  If anyone has ever had Pasta DaVinci from The Cheesecake Factory, this recipe is a close second.  I would rate it at an intermediate skill level.  It took a lot of time and attention but it was totally worth it in the end.  The key is in finding the right wine.  Make sure it is a red Madeira and ask the wine specialist at the liquor store for their recommendation.  The wrong wine will ruin the dish.

The "focaccia" is not homemade so I apologize if I was misleading.  It is however, so easy and so good! I can't wait to make it again.

I often find that cooking is therapeutic for me and this dish was a good example.  I've been in sort of a funk this week and making this dish allowed me to zone out and focus on something else for a little while.  And then, in the end, I got to be really proud of myself for this excellent meal that I had prepared.  Double win!

Here's a look at the final product, hot and ready to eat:


Penne Leonardo

So now the pasta recipe.  I would say this serves 4-5 good servings so it would be good for a family meal or couples night, although I am enjoying the leftovers as we speak and they are pretty damn good.

Ingredients
2 cups penne pasta cooked al dente
1/4 cup red onion-chopped (You guessed it, using the Vidalia Onion Chopper)
1 cup crimini mushrooms sliced (Use whatever mushrooms you prefer...it doesn't matter.)
2 tsp garlic-minced (I used the cheese grater method again)
1/2 lb chicken breast cut into bite size pieces
4 tbsp butter, halved
2 tsp salt
1 cup red Madeira wine
1/2 water
2 tbsp heavy cream
Pepper to taste

So there is kind of a lot going on in this dish and it's best to have everything chopped, diced, sliced, poured and whatever else before you start, that way you're ready when the recipe calls for it.  This is what my table looked like before I even turned on the oven:


Directions:
1. Cook pasta in salted water with a dash of olive oil according to directions on the box for "al dente" pasta. Putting olive oil in the water when cooking any pasta is a tip I learned from my friend and study abroad alum Ali Cannoni.  This keeps the pasta from sticking together when you are ready to serve!
2. Saute onions, mushrooms and garlic in 2 tbsp of butter until tender. Add salt. Remove and set aside for later.

3. In the same pan, cook the chicken until cooked through, stirring frequently.  I had to add some olive oil here so the chicken didn't stick.
4. Remove chicken and set aside.
5. In the same pan, add 2 tbsp butter and melt over a low-medium heat.
6. Sprinkle the flour over the butter and stir to make a roux.
7. Slowly add in the wine, water and heavy cream, stirring constantly.
8. Cook over a medium-high heat until thickened, stirring often to keep from sticking to the bottom of the pan. Taste often during this step.  If you can taste the alcohol flavor or if it tastes really sweet, keep cooking the liquid down.  You can also smell the steam and if it smells like alcohol, keep cooking.  I would say I probably let the liquid simmer and thicken for about 10-15 minutes.
9. Add the chicken, muschrooms, garlic and onions back in and simmer for a few more minutes.  Salt and pepper to taste.
10. Toss the pasta with the sauce mixture and top with Parmesan cheese.

Sweet Onion Focaccia

This focaccia is a great and easy side dish for any pasta dish, in my opinion.  I adapted it from a recipe in Taste of Home and it is so amazing.  I actually plan on making it again tomorrow evening to serve with lasagna. :)

Ingredients:
1 small Boboli crust
1/2 sliced small yellow onion
1 tbsp butter
1 tbsp olive oil
1 tsp sugar
1/4 cup grated Parmesan cheese

Directions:
Brush the bottom of the pizza crust with olive oil and cook until crisp in the oven or on the grill.  If cooking in the oven, heat to 400 degrees.  Remove crust once crisp and set aside.  Cook the onions in the oil and butter in a medium skillet.  Add sugar and cook until soft and onions are golden brown.  Top the pizza crust with onions.

Top with parmesan cheese and bake until golden brown.  About 5-8 minutes.  Watch closely so the crust doesn't burn.  Cut into 8 small triangles and serve.
I was, fittingly, watching Hell's Kitchen while this making this delicious meal.  I love me some Gordon Ramsey.

Good eatin',

Deedles

Monday, July 25, 2011

Hannah Banana Bread

The title of this recipe is obvious.  There is, however, a special meaning there as well.  My oldest brother, Jeremy, has always called me Hannah Banana which was often shortened to just Banana.  I didn't embrace it at first, but as we have gotten older and see each other less often, I welcome the term of endearment from Gorpy (yet another nickname...it's a common theme in our family.)

You'll probably find that I don't do much "baking."  I prefer cooking to baking for several reasons.  Savory flavors appeal to me more than sweet in general and I like to cook what I like to eat. :) Also, baking requires being very exact and precise with measurements and following directions.  While those of you who know me know that I am quite a Type A personality, I prefer to be more fluid in the kitchen.  A pinch here, a dash there...taste...add again.  That is much more my style.

Every once in a while, though, I get the urge to bake.  It was easier this time, considering I had three bananas that were about to be thrown out.  Sometimes convenience is the only push we need.

Ingredients:
1 1/2 cups all-purpose flour
1 tsp baking soda
1/2 tsp salt
1 cup white sugar
2 eggs, beaten
1/4 butter, melted
3 bananas, mashed

Directions:
1. Grease and flour a bread pan.  Preheat oven to 350 degrees. 
2. In one bowl, whisk together flour, soda, salt and sugar.  Mix in slightly beaten eggs, melted butter and mashed bananas.  Pour into pan.
3. Bake at 350 for 1 hour or until a wooden toothpick inserted in the center comes out clean.

Nutritional Info:
Servings per recipe: 16
Amount per serving:
Calories: 145
Carbohydrates: 26.54 g
Cholesterol: 34.06 mg
Dietary Fiber: 0.89 g
Fat: 3.69 g
Protein: 2.27 g
Sodium: 180.97 mg

So there it is, folks! A delicious and super easy banana bread recipe.  I love this for breakfast but it is also a great afternoon snack.


Good eatin',

Deedles

Sassy Menefee Chicken Wraps

Hey everyone!!! This post is dedicated to my cousin, Mallory Menefee, who stayed with me for a month in the spring of 2010.  She is one sassy woman and this wrap is aptly named after her.  She was shadowing me for an internship opportunity and we had a great time together!!! While she was here, she introduced me to this quick and easy meal.  I've tweaked a few things but the basics are still there and it is delicious!!! Here is a picture of the wrap in all its glory before it's rolled up.


I mean, come on, isn't that amazing???

Okay, so here is how you make this delicious treat.

Ingredients:
1 Mission sundried tomato and basil wrap (their spinach and whole wheat wraps are delish as well)
1 chicken breast cooked and chopped
2 slices of bacon, cooked (optional)
1/4 shredded lettuce
1/4 fresh spinach
1 tbsp diced red onion (optional)
Shredded cheddar cheese
Ranch dressing to taste
Sriracha sauce to taste

I generally make 3 or 4 chicken breasts at a time so I can enjoy this meal for a few weeks.  I marinate them in Lawry's garlic and herb marinade or Italian dressing. Since I haven't had a grill, I bake the chicken breasts on 350 until they are cooked through but they would be great grilled as well.  Before putting everything together, heat the wrap for 20 seconds in the microwave.  The wrap is easier to manage when it's warm.  Reheat chicken breasts in microwave if needed.  Put everything together in the center of the wrap and and drizzle the dressings over top.  Wrap.  I tend to use more ranch than Sriracha but that is totally dependent upon how spicy you want it to be.  I like to balance the spice with grapes or something sweet on the side.

I enjoyed this tasty treat while watching a marathon of Project Runway.  I do love that Tim Gunn.  Make it work!

Good eatin',

Deedles

Monday, July 11, 2011

Mongolian Beef and Homemade Egg Rolls

Hello everyone! It's been awhile since my last post but I haven't had much time for homemade meals what with my family in town for the 4th of July holiday! It was great to have them all with me and to spend some time with friends as well.  With my family gone, I like to surround myself with friends and part of that means cooking.  I, like my mother and grandmother(s), show my love through cooking and food.  So on a girls night in for fright night (Scream 2 and 3), Mongolian beef and homemade egg rolls were on the menu!

Lets start with the egg rolls! I have had this recipe for years and was always too nervous to try them.  They sound so intimidating! This evening with the girls was a great motivator and they were delish and way easier than I expected.  Here's the recipe:

Homemade Egg Rolls
1 pack of egg roll skins (got them at Safeway and saw them at Sunflower Market...ask if you can't find)
1 lb ground turkey
2 jalapeno peppers
1/2 bell pepper (I used red for the color contrast but it's up to your preference)
1/2 yellow onion
1 bunch green onion
2 cups spinach leaves
1/2 cup shredded carrots
Bean sprouts
1 tbsp Soy Sauce
1 tsp Ground ginger
Salt and pepper to taste

I once again used my Vidalia Onion Chopper for the veggies. 
Brown ground turkey with all ingredients.  Add soy sauce, ground ginger, salt and pepper to taste.  Drain pan if needed.  Add enough green onion, spinach and bean sprouts to spread throughout mixutre or to personal liking.  I am not a  huge fan of bean sprouts so I bought one bag from the store and ended up using about 3/4 of the bag.  Look how yummy the filling is!


Follow directions on egg roll skins package to roll egg rolls.  Fill each egg roll with one or two spoonfuls of mixture.  Roll tightly so filling will not fall out when frying.


Heat a deep frying pan to medium/high heat with vegetable oil or use an electric fryer.  If pan frying, do not over fill with oil and turn each egg roll to cook on all sides. I used a deep fryer in order to ensure that they cooked evenly. Drop a few egg rolls in at a time and cook until brown.  Drain on paper towels.


And now the main dish!!! Mongolian beef is always a fave when I eat out at Chinese restaurants and I had no idea how easy it is to make at home! Once you have the ingredients, you are good to make this recipe over and over again and it has always been a crowd pleaser.  I have even passed it on to my mom and dad who have made it for family.  Yummy!

Mongolian Beef
2 tsp vegetable oil
1/2 teaspoon ginger, ground
1 teaspoon garlic, ground
As mentioned in a previous blog, I do both the ginger and garlic on a cheese grater.
1/2 cup soy sauce
1/2 cup water
3/4 cup dark brown sugar
2 tbsp vegetable oil for frying
1 lb steak for stir fry or flank steak that would need to be cut up
1 bunch green onions cut into one inch strips

I marinate the meat in the marinade recipe from the Fried Rice blog.

Cook one cup of white or brown rice to serve with meat.  Heat the vegetable oil for frying in a large skillet and brown meat until no pink is showing.  Meat will cook through when liquid mixture is added.  Drain.

To make the sauce:
Add 2 tsp oil with the ginger and garlic to a small saucepan over medium/low heat.  Heat until fragrant but do not let the ginger and garlic scorch.  Add the soy sauce immediately to avoid burning the garlic.  Add the water and soy sauce.  Dissolve brown sugar in the sauce, then raise the heat to medium and boil the sauce for 2-3 minutes or until it thickens.

Add the sauce to the meat pan and cook for a few minutes on low heat.  Add the green onions and cook, covered, for another two minutes.  Serve!


Once you find the courage to try Asian cooking at home, you won't be able to stop! It is so easy and so delicious. 

As a side note, I was enjoying a Harry Potter marathon while making these delicious treats!


Good eatin',

Deedles

Tuesday, June 28, 2011

Fabulous Fried Rice

I am so excited to share this recipe with everyone! I absolutely love Chinese food and decided a few months ago that I was going to try and start making it at home.  I started out with this recipe for fried rice and it is SO GOOD.  I make it a couple of times a month and it makes a huge amount and there are always leftovers.  I've shared this with my parents and some friends and everyone has raved about it.  Let me know what you think!

Ingredients:
1 lb beef for stir fry, sliced chicken breast or shrimp or combination
2 cups rice
1 1/2 c. peas and carrots, chopped
1/2 c. chopped sweet onion
2 eggs
2 tbsp vegetable oil, separated
2 tbsp soy sauce
1 tbsp sesame oil
1/2 c. green onion, chopped for garnish

Easy Asian Marinade:
1/3 c. vegetable oil
1/3 c. soy sauce
1/3/ c. white wine for cooking
2 tsp grated garlic and fresh ginger

Like I said above, this makes a huge amount.  If you're cooking for few people and/or don't want leftovers, I recommend halving the recipe.  The leftovers are delicious, though, so it's up to you!

At least a few hours before cooking, I marinade the meat in the marinade recipe listed above.  Sometimes, depending on what I have in the house, I omit the garlic and ginger and the marinade is still delicious. 

Cook rice first. I have a rice cooker that I use.  If you don't have one, cook according to the instruction listed on the bag.  While rice is cooking, heat one tablespoon of vegetable oil in a medium skillet.  Add meat and cook thoroughly. For the shrimp and beef, cook until there is no pink on the outside and remove from heat as they will cook through in the rice.  For chicken, cook thoroughly before adding to rice mixture.  In a large skillet or electric skillet (my preference), heat the other tablespoon of vegetable oil on medium to medium high heat.  Add peas and carrots.  Cook for a few minutes until carrots start to get tender then add the chopped sweet onion.  I once again use the Vidalia Onion Chopper for this because it chops the onion really small and even so everything cooks through in the same amount of time. 

This is what it looks like:


As veggies are cooking, whisk the egg in a separate bowl.  Once the veggies are tender, move them all over to one side and add the egg.  Scramble the egg and mix it with the veggies once it's cooked. 

It's starting to come together!!

YUMMY!!!
Next, add the soy sauce and sesame oil.  Immediately add the rice and stir it all together.  Add meat and green onion, reduce heat and cover for about 5 minutes.  Serve!

Suggestions: I use frozen peas and corn that can be found in the frozen food aisle.  I also don't add as much as is listed above but I like less veggies so it would be your own preference.  At the step where you add the soy sauce and sesame oil, after adding the rice to the skillet I add approximately another tablespoon of soy sauce until the rice is browned.  I serve this with egg rolls, wontons or egg drop soup with great success.

Here it is folks!


This is beef and chicken fried rice that I served with mini egg rolls with Angela Pappas while enjoying the Mob Wives finale followed by Keeping Up With the Kardashians.  Yes, we like trashy TV.  What can I say?

Good eatin',

Deedles

White Pizza

Welcome back! I haven't posted in a few days but I wanted to share another delicious creation I concocted this weekend.  I always love white pizzas when I'm out at restaurants but I've never actually made one at home.  It's really easy and most of you have probably done it yourself but I thought I'd share this for those of you who have not tried it before!

I made this on Sunday night after an epic day beside the pool in 90 degree Colorado sun for approximately four hours so to say I was exhausted is an understatement! This recipe was simple and delicious and yielded leftovers for the next day. :-)

Ingredients:
1 thin Boboli crust
4 tbsp olive oil
3 cloves garlic
panful fresh spinach (remove stems, wash and dry prior to cooking)
2/3 c. ricotta cheese
1 big ball fresh mozzarella cheese
1/4 c. grated parmesan

Heat oven to 400.  Heat 2 tbsp olive oil in a pan on medium heat.  Add spinach and grated garlic.  (I grate the cloves on a cheese grater because I like the taste of garlic but not big chunks.)  Turn the spinach several times to make sure it's coated and then cover for 1 minute.  Uncover and turn again.  Cover for one minute or until spinach just starts to wilt.  Brush both sides of the crust with olive oil and placed it directly on the oven rack.  Just watch it closely and test it for crispness.  While crust is in the oven, grate the fresh mozzarella.  When crust is ready, remove and let cool on a pizza pan.  Brush top again with a little olive oil.  Spread spinach mixture over crust.  Spoon out ricotta in small spoonfuls across the crust.  Top pizza with mozzarella and parmesan cheeses.  Return to oven and heat for 8-10 minutes or until cheese is melted.  Broil for a few minutes so cheese bubbles and browns a bit on top.  Remove from oven and let cool before serving.

Here is the final result:

I love this option for something different than the same old homemade pizza.  This was another product of a Criminal Minds marathon...I told you there would be a theme.